You’re in. YOU’RE IN! Congratulations!
Now it is time to learn all about navigating WordPress. (Just in case you missed last week’s wink and haven’t logged into your WordPress CMS yet, check out that post here.)
Let’s begin Navigating WordPress, shall we?
 You can access all the great tools that your WordPress CMS has for you to manage and update your website content from the main navigation along the left hand side of your dashboard.
Think of the main navigation as your key to all the administrative tasks you will need to accomplish within WordPress. Such as changing your site’s appearance with a theme (see Appearance -> Themes) or adding a new post to your blog (see Posts -> Add New).
Whenever you wish to execute a task, simply click on the navigation item that closely resembles the task, and a sub-menu will drop down showing you all of your available options.
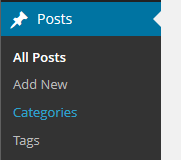
For example, if I want to manage my post categories, I would click on “Posts”. Then from the sub-menu, I would select “Categories”.
From this point on in my tutorials, I will represent a main navigation and sub navigation item as (see main navigation item -> sub navigation item).
Real WordPress Example:

For this example to the left, I would represent that as (Posts -> Categories). Make sense?
Do you know someone who could benefit from either my professional packages or my free WordPress Winks? Send them my way! They’ll be glad you did. Next week we will take a look at the most commonly used tool in WordPress: Posts.
